Tuesday, January 26, 2010

Tear-Away Technique for Making Texture Sheets

One of the reasons I like PMC so much is that you can use so many different textures with it. In this blog post, I am going to do an experiment with a technique I first heard about in my certification class: Polymer Clay Tear Away Technique. I’m writing this as I go along, so as of right now I don’t have any idea whether it will work or be a complete failure. I am also going to try my own twist on the technique.

I want to address why I would want to do this in the first place when there are so many ready-made texture sheets and rubber stamps available. Well, for several reasons: First, if I want a piece to be truly original, using a commercially made and readily available texture sheet isn’t the way to go. Anyone can purchase them, which means my piece won’t be unique. Second, I will have a piece I can say is truly mine, right down to the texture, which I will draw myself. Third, I won’t have to deal with copyright issues if I use my own texture. This can be an issue for an artist if he or she plans to sell the piece.

And so, after searching the internet, I found several sources for instructions on this technique. I will be using this article by Celie Fago: Hinged Metal Clay Box Pendant, which first appeared in Lapidary Journal Jewelry Artist Magazine in 2006 and is available for download at the link above. If you are at all interested in this technique, download this article, as Ms. Fago has a lot of good background information that I won’t go into here.

Basically, this will be a test to see if the supplies and tools I have will work with this technique. It requires photocopies or prints made from an older photocopier that has iron-based toner (I have also read carbon-based toner). I do have both a toner-based photocopier and printer, but neither is that old so I don’t know how well this will work. The first step is to get my artwork onto my paper (which should be a glossy 32 lb paper – Hammermill or Staples is recommended – and I just so happen to have some of that on hand (yay!)). After fighting with my scanner for a while, I did manage to get my doodle scanned in so I could clean it up. The instructions say it has to be black and white only – no grayscale, so I have to work to get it clean enough to use.
The next step is to get my clay ready. It calls for white (or very light) Sculpey III. I don’t have that. I have white Premo (made by Sculpey) and a pearl Sculpey III (also white Sculpey Ultra Light, but that is such a different texture, I’m not going to try it), so I think I will try both. I’ve run the Premo through the pasta machine at the highest setting and now it’s time to burnish. Putting the image face down on the clay, I rub with my hand in a circular motion for a couple of minutes.

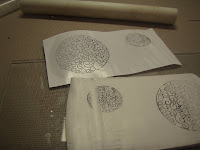
Now I’m and letting it rest under a light for 10 to 15 minutes. Then I burnish and rest it again. After resting, it’s time for the reveal by grasping the edge of the paper and pulling quickly like you would a Band-Aid. And so here are the results of my tests:

The first attempt (with the Premo and a print from my HP 2600n printer) kind of worked. Part of the clay tore off like it was supposed to and part of the image just transferred to the clay.
The second attempt was just something to do when I was waiting for the first attempt to rest. It was with an image from my HP Printer and using Sculpey Ultra Light. I didn’t expect it to work, and it didn’t. The clay just wasn’t right.

The third attempt, with an image from my photocopier and pearl Sculpey III seemed to work better. It’s very faint, but it is there. I’m going to try and bake this one and see how it goes. (It really wasn't deep enough.)

Next I tried some plain vanilla Sculpey III (by that I mean with no sparklies like the pearl has – and the color is vanilla) that I found with another image from my Sharp copier. This one definitely worked the best. The image was thicker and pretty sharp.

The last one is a total experiment. I had read, as I mentioned before, that carbon based toner works best so I wondered what would happen if I drew with charcoal (which is carbon based, right?) onto the paper and used that image. This one was a bust. I am guessing it’s because the charcoal drawing was just too light.

Bottom line: my experiments didn’t work very well. What worked best was the darkest image with the most black using my older Sharp toner-based photocopier printer on the plain vanilla Sculpey III. Basically, follow the directions in the article (and don’t experiment like I sometimes do) and it will work. It might work better if I had access to an older copier. I could tell which was going to work the best after the first resting stage because I could already see the clay attaching itself to the toner through the paper. I'm pretty pleased with the final results. The texture is quite shallow but still visible. The texture sheets give the depressions (the parts that are raised on the texture sheet itself) a rough, matte look.

Saturday, January 16, 2010

Back to the Beginning

I began making jewelry with beading, but since my discovery of PMC, I have done less and less beading, which is too bad because I have a ton of beads just screaming to be used. So I have decided that since I am out of PMC and more won't arrive until late next week, I would pull out the beadboard and work on some of the beading projects that I have been thinking about for a while. Here's a sneak preview.

Monday, January 11, 2010

Challenging Myself

This piece has been in my mind for a very long time, at least in an abstract way. I wanted to do a photo album/book type of pendant. Originally, I wanted to make it with a cover and one page inside (room for a total of four pictures). I just wasn't sure how to make it open. I wanted something that looked more like a book than just attaching the pages with jumprings would do.

I figured the best way to do it was a hinge, but I also decided that that would make it difficult to do the extra page in the middle and so, at least for my first attempt I decided just the two pages, front and back, would be best.

As I normally do when I am faced with new challenge, I researched the best way to make hinges out of PMC. They have to be pretty exact or the book won't open and close. I found several articles on how to make PMC hinges and I kept those in the back of my brain for quite a while. I think it's been probably a year since I first thought of this project. When I would be trying to decide what new project to start, the book would come back into my head. But I never started it.

Then, a couple of months ago, I saw an announcement at www.metalclayfindings.com for a design contest for the new Metal Clay Artist Magazine. The requirements were that you needed to purchase a set of Metal Clay Findings' findings and incorporate a certain amount of them into your piece. I got the set of findings, but I was busy with Christmas things and didn't get a chance to really look at the findings until after the holidays.

As soon as I saw them, I knew I would make my book. Included in the set was a fine silver tube, 3mm in diameter and 25mm long, which looked like the perfect size to try hinges.

And so I plunged into what might be the most technically difficult piece I have made. I had to solve the problem of the PMC "pages" shrinking while the tube did not. I also had to make a rod to fit inside the tube to hold the hinge together. How would I hang it as a pendant? How would I keep it closed?

I'm not the kind of person who can draw something out and figure it out. Drawings help but I figure things out better by actually doing them. I worked slowly, deciding on a design for the front that would incorporate one of the bezel settings and several of the tiny silver beads provided in the kit. I decided to make the closing mechanism part of the design as well. I used one of the included embeddable jump rings to attach to the fine silver rod I was making to fit inside the hinge. To solve the shrinkage problem, I decided to do a double firing.

I am very pleased with the way it came out. The pendant is about 22mm tall and 17mm wide (closed, not including the jumpring). I set a fancy jasper in the middle of the front along with a design I made with the little silver balls. The jasper goes well with the patina, I think. The closure wraps around the the jasper setting and holds the book closed pretty well.

The deadline for submission of photos for the contest is February 1. I'm still trying to decide whether or not to enter this piece. It's not perfect, for sure. I can see things that I am sure others would not. Whether I do enter it or not, it was fun to, and a challenge as well. I learned a lot in the process.

Tuesday, January 5, 2010

Crazy Cat Lady


I have always told my kids that when I grow old I'm going to be the crazy cat lady. Well, they already know I'm crazy, so it won't be that far of a jump. Because I love cats so much, I have quite a collection of cat-related items, all of them in my studio, which really isn't all that big. In the interest of showing parts of my work area (and of not doing any actual work), I thought I would share some of my cat related items.

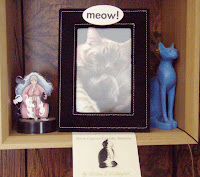
Below is one of the many shelves in my office, which has, starting on the left, a little metal lady with magnetic kitties stuck on her (appropriately titled "The Crazy Cat Lady"); a picture of Willow and Sammie; Bastet, the Egyptian goddess and protector of women, and a kitty pin given to me by a friend (I get a lot of cat gifts. The frame here was given to me by my husband.)


A kitty clock. The tail is supposed to swing like a pendulum but I have never been able to get it to work.


One of my wall groupings. Starting at the top and going clockwise is a sign that says "Thousands of years ago, cats were worshipped as gods. They have never forgotten this.," a picture of a siamese cat that was taken from a calendar, a lovely little card with siamese kitties that I framed and, lastly, a watercolor by Rachel Parker. This particular picture is from a calendar, but I also have several prints by her. I love her renditions of siamese cats. You can check out her work by clicking on her name, above. I highly recommend it.


This is the right side of my window seat. On the bottom are pillows, one with a siamese cat embroidered and another that says "Try to be the person your cat thinks you are." Above are two more prints by Rachel Parker.
Below are the newest additions to my collection, which I bought today (along with the plaque pictured at the top of the page), even though I shouldn't have. I couldn't resist. The clock in the middle represents Willow, a seal point Siamese. On the left is Joey, who was a blue lynx point Balinese and who died in 2007 at age 19. Lastly, on the right is my fat cat Sammie.


Oh, and the real thing as well. My father-in-law made me a bird feeder for outside the window of my studio for Christmas. I wanted it so the cats could watch the birds and squirrels and, as you can see, Willow loves it.


I have much more in my collection that I won't bore you with, including some lovely ACEOs by endlesswhimsy of the Etsy Maine Team. My sales fairy, Seraphina is holding a kitty and I have a lovely kitty ornament hanging on my computer that I got in our Etsy Maine Team holiday gift giving thingy from Kirsten of anabelfuzz. And right now I am drinking coffee out of a mug that says "Crazy Cat Lady". Yup, that pretty much sums me up.